


Trip Overview: 2 day/2 night camping and hiking trip in Yosemite National Park. Two hikes totaling ~20 miles and +/- 4,000 feet with a starting elevation of 8,100 feet and a peak elevation of 9,900 feet. Highlights include expansive granite cliffs/domes/valleys, alpine lakes, and green meadows. We completed this trip at the end of July in 2015 (Friday night through Sunday afternoon).
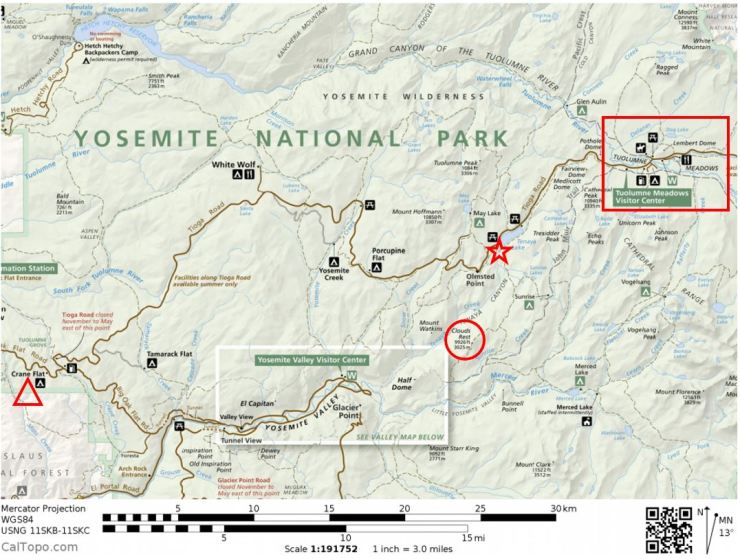
Overall Map, Yosemite National Park, Clouds Rest (pdf)
Shop Sale & Clearance Items at REI.com (up to 50% off)!
Preparations:
Permits and reservations: No permits are required for hiking up to Clouds Rest or to the top of the Lembert Dome. As a result, these are great hike alternatives if you are unable to obtain permits to hike to the top of Half Dome. If you plan to backpack and camp in the wilderness area around Clouds Rest, an overnight permit is required though.
For camping, it is best to reserve sites well ahead of time as Yosemite is extremely popular. You can find information on reservations here. The date on which you can make a reservation depends on when your trip is, but you typically can reserve a site 4 months in advance. The campsites fill up extremely fast, so you will want to log in early on the day the reservation system opens up.
If you cannot get a reservation and still want to go to Yosemite, you can try to grab a spot at one of the first-come, first-served campgrounds. You can check the status of the campgrounds here. Generally these sites will all be filled up early on Friday, so you probably need to leave before Friday to grab a spot (though you could get lucky on a weekend).
Another option is to camp at one of the hike-in, backcountry sites. To camp here, you need a wilderness permit, which you can apply for up to 168 weeks in advance of your trip.
We wanted to camp at one of the hike-in sites at either Little Yosemite Valley, May Lake, or Porcupine Creek, so we submitted a request for a wilderness permit in February (for our planned trip in late July). Our group (12 people) ended up being too big and our permit request was promptly denied.
As a backup, we decided we would just camp at one of the drive-in reservable campgrounds. Early in the morning on March 15th (the earliest date to reserve sites for a trip in late July) we logged onto the campsite reservation website and tried to reserve campsites in Tuolumne Meadows. Sadly we were too slow and all the Tuolumne Meadow sites were filled up. Eventually, we ended up reserving campsites at the Crane Flat Campground. This campsite ended up being just fine. The only downside was it was a ~50 minute drive away from the trailhead for the Clouds Rest hike.
Supplies: There are black bears in the park, so you need to bring a bear canister for any backcountry camping. If you stay at an official campsite, there will be a metal bear vault you can use instead. Bear spray is not allowed, so do not bother bringing that.
You likely will want bug spray because the mosquitoes can be out in force in certain areas of the trek. I prefer a picaridin based spray because it does not damage plastics and synthetic fibers like high concentration DEET sprays do. I also like to pre-treat my clothes and tent with permethrin spray repellent. The permethrin treatment stays on your clothes for up to 7 washes, so it helps reduce the amount of spray you need to put on your skin.
Below is a list of suggested of suggested gear for hiking and camping in Yosemite:
Hiking clothes
- a lightweight hiking rain jacket (North Face Venture 2 Jacket)
- fast drying synthetic hiking pants (prAna Zion Pants)
- a quick drying long sleeve hiking shirt (Columbia Silver Ridge L/S Shirt)
- wool outer socks (People Socks Moreno 4-pack)
- thin blister preventing base socks (WrightSock double layer Coolmesh)
- quick drying synthetic boxer briefs (ExOfficio Give-N-Go)
- light bandana for sun protection (Levi’s printed bandana)
- mesh back trucker hat (Patagonia LoPro Trucker Hat)
- adjustable fabric belt (Bison designs belt)
- Gore-tex hiking shoes (adidas Outdoor Terrex Fast R Gore-Tex Shoe)
Clothes for camp
- wool leggings (Minus33 Merino Wool Kancamagus Midweight Bottom)
- wool base layer shirt (Minus33 Merino Wool Chocorua Midweight Crew)
- warm wool overshirt (Pendleton Long Sleeve Classic-Fit Board Shirt)
- lightweight down jacket (Patagonia 800-fill Down Jacket)
Hiking gear
- topographic map (Tom Harrison Yosemite National Park Recreation Map)
- trekking poles (Cascade Mountain Tech Carbon Fiber Trekking Poles)
- 3 liter hydration bladder (Camelbak Antidote Reservoir)
- backpack (Osprey Daylite Daypack)
Camp gear
- strong tent with rain-fly (Alps Mountaineering Chaos 2 Tent)
- inflatable sleeping pad (REI Co-op AirRail 1.5 Self-Inflating Sleeping Pad)
- sleeping bag (The North Face Furnace 20 degree Sleeping Bag)
- lightweight backpacking chair (Therm-a-Rest trekker chair)
- lightweight lantern (MPOWERD Luci Outdoor 2.0)
- headlamp (Black Diamond Storm Headlamp)
- multi-tool with knife (Gerber MP400 compact multi-plier)
- bear canister (BearVault BV500)
- lightweight stove (MSR PocketRocket 2)
- lighter (BIC plastic lighters)
- 2 liter pot (GSI Outdoors Halulite Boiler Pot)
- coffee cup (GSI Outdoors Glacier Stainless Cup)
- lightweight spork (Snow Peak Titanium Spork)
- small, quick drying towel (REI mutli towel lite)
Random
- wet wipes (Stall Mates individually wrapped wipes)
- mole skin for blisters (Spenco 2nd Skin Adhesive)
- small amount of duct tape for gear repairs
- chapstick and sun screen
Food and drink
- a variety of my favorite dehydrated meals
- salami and summer sausage
- electrolyte replacement (NUUN Hydration Tablets)
- quick snacks (Clif Shot Bloks and Clif energy bars)
- instant coffee (Starbucks VIA)
- small plastic water bottles filled with whisky 🙂
Day 0: On the first night, we drove up to Yosemite and checked into our sites at Crane Flat. The campsites were nice and each had picnic tables and fire rings. There were trees at the site, so we set up our hammock. And, there was plenty of room on each for multiple tents. Our campsite had a metal bear vault, but if you end up camping in the backcountry, you likely need a bear canister
.
We made dinner, had a few drinks by our fire, and then got some rest so we could wake up early.
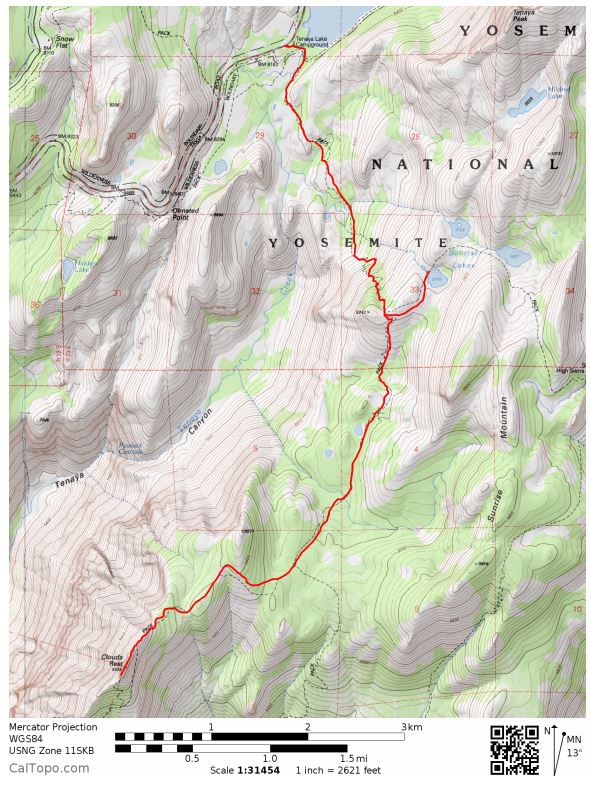
Day 1: 14.2 miles; +3,200 feet / -3,200 feet; Sunrise Lakes Trailhead to Clouds Rest and back.

On the first day, we hiked the popular trail up to Clouds Rest. This is a peak at ~9,930 feet elevation that provides great views of Half Dome and Yosemite Valley.


We woke up early in the morning so we could eat breakfast and get to the trailhead. We packed our day packs with snacks and lunch, filled up our camel backs, and then drove ~50 minutes to the Sunrise Lakes Trailhead next to Tenaya Lake. The parking lot at the trailhead was small, but we were able to grab parking spots (we arrived at about 9:00am). You can also park along the side of the road in many places if the lot is full.

We set off on the hike shortly after 9:00 am. The trail was well marked and easy to follow. Just follow any signs that direct you towards Clouds Rest. The beginning of the trail goes through the forest and is mostly covered. After an easy first 1.5 miles, the trail climbs ~1,000 feet in 1 mile. As the trail flattens out, there is a side trail that leads to the Sunrise Lakes. These lakes are a nice place to rinse off on the way back from Clouds Rest.


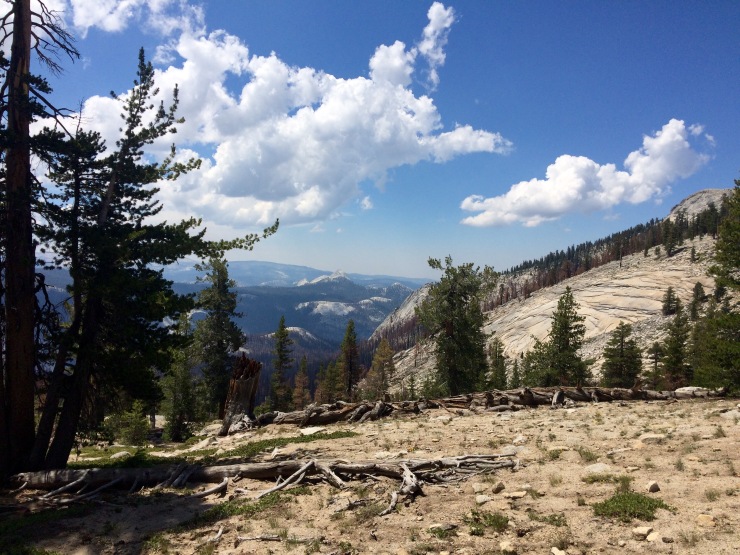
As you finally approach the peak of Clouds Rest, the trail follows a fairly narrow granite “cat walk” that leads to a wider area at the end of the trail. The views on either side the cat walk are great, but the views are best at the area at the end of the trail.


Once you get to the peak, the views of Half Dome and the surrounding valley are spectacular. With a pair of binoculars you can see the line of people climbing up to the top of Half Dome.


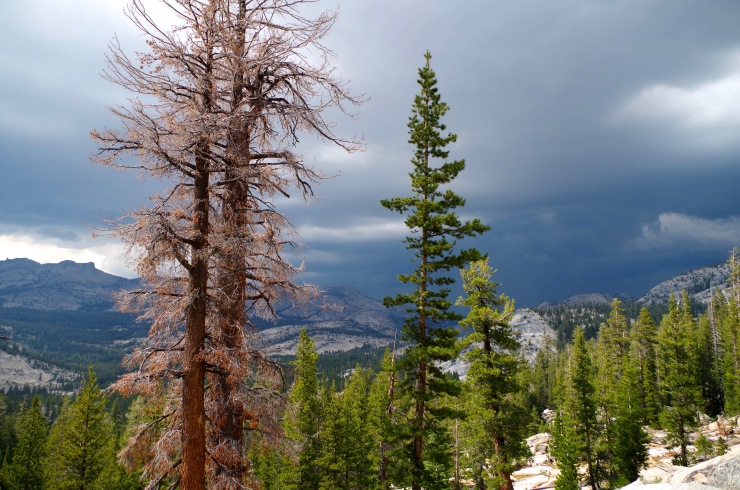
Along the way back from the Clouds Rest, we stopped the first of the Sunrise Lakes to check out the scenery and go for a quick swim. The first of the lakes was really pretty and the cold water was freshening after a long hike.


After swimming in the lakes for a bit, we started to hear thunder and decided to quickly hike the last 2.5 miles back to the car. We made it to the car before any rain fell and the storm ended up missing the Crane Flat campground entirely.

Day 2: 5.1 miles; +980 feet / -980 feet; Lembert Dome area
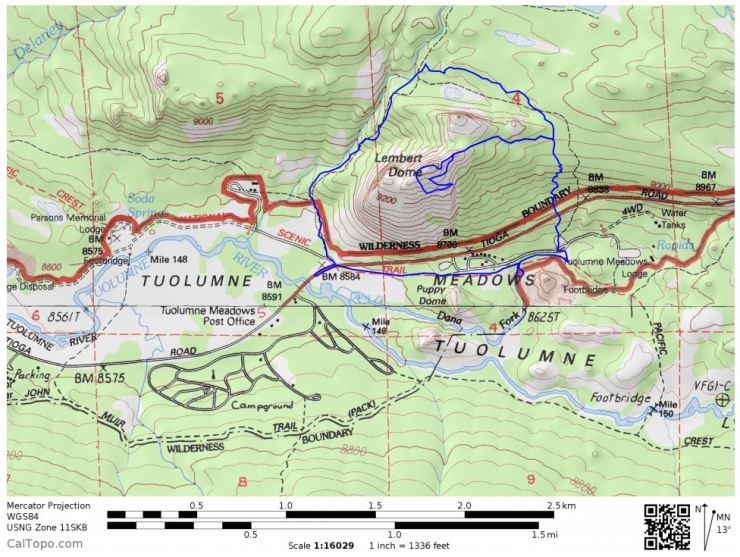
Yosemite – Tuolumne Meadows and Lembert Dome Map (pdf)

On the second day, we decided that we wanted to go see Tuolumne Meadows. We woke up, ate some breakfast, packed up our tent, and then drove ~1 hour to the Tuolumne Meadows area. The drive is quite nice and is very scenic. When we arrive in the meadow area, we struggled to find parking until we snagged a spot across the street from the Lembert Dome Picnic Area.

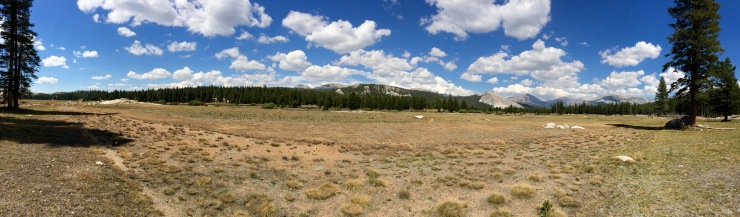


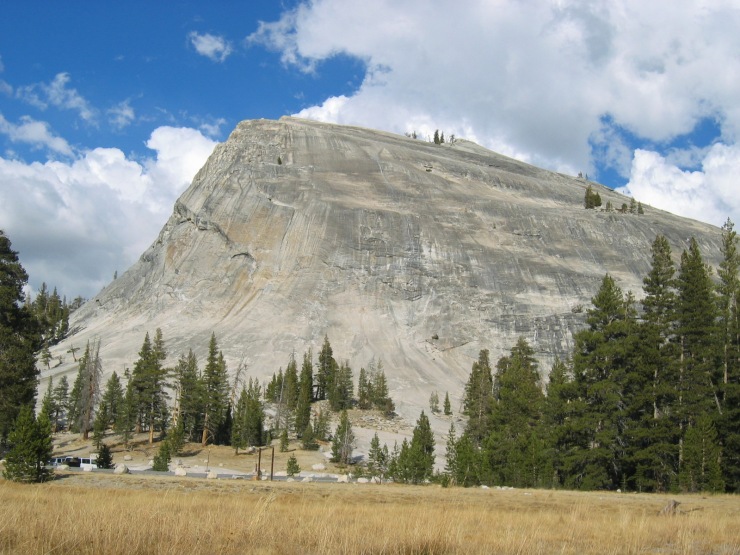
After parking and looking around, we realized there were people on top of the Lembert Dome and decided we wanted to hike up to the top of it. This ended up being a really neat hike. The dome is a giant granite slab that you can climb around on without the need for any ropes or equipment. At the top, you get great views of the Tuolumne Meadows area.
We started hiking from the Lembert Dome Picnic Area and took the Dog Lake Trail. At about the mile mark, you turn right and head toward the backside of the dome. After another ~0.5 miles, you turn right again and take the Lembert Dome Trail up to the top of the dome. When you reach the actual dome, there is not much of a trail, but you just hike/scramble along the dome until you reach the top (or until you do not feel comfortable going any further).


When we got off the dome and back to the junction at the end of the Lembert Dome Trail, we decided to take the trail towards the Tuolumne Lodge rather than back towards Dog Lake. This trail crosses Highway 120 and then goes through the Tuolumne Lodge area. Eventually we met up with the Pacific Crest Trail, which follows the Dana Fork. We went up to the edge of the Dana Fork and took some pictures and explored the area. Then, we continued on the trail until it led us back to our car.


After we got back to our car, we drove back down Highway 120. We decided to make one last stop at Tenaya Lake to rinse off and have our last beers before going home. The lake was beautiful and almost empty. We were super happy that we stopped.

Here are some similar trip reports:
Grand Canyon Hiking – South Kaibab and Bright Angel Trails
Banff Hiking – Plain of Six Glaciers Trail, Lake Louise, and Grassi Lakes

What a great write up!!! I’m planning to do Clouds Rest on Saturday. Super excited. How much water did you pack? Were there mosquitos? How long did it take you?
LikeLike
I am glad you liked the write up! On the hike I took a camelback with 2 liters of water, but I remember being out of water by the time I got to the end of the trail. So, I would recommend bringing at least 2 liters. If you plan to purify water, there is the lake at the 3.5 mile mark, but I do not recall there being water sources between miles 3.5 and 9.5. There are mosquitos on the first and last ~4 miles of the trail. I don’t remember having any issues with bug when we got out of the forest area and up towards the peak. You’ll probably want repellent if bugs bother you, especially since things are likely to be wet this year with all the snow over the winter. We were on the trail for 7 hours, which included spending an hour on the peak and spending a half hour at Sunrise Lakes. We are moderately fast hikers though. I would note that you likely need to ford the Tenaya Creek at the beginning of the hike, so be prepared to get your legs wet. We were able to just rock hop across it in 2015, but it’s likely deeper this year. Have fun on the hike!
LikeLike
Thank you for the detailed response! One last question. Not that I plan to be on my phone but is there cell service?
LikeLike
I had my phone in airplane mode the whole time, so I do not know for sure. The NPS website has some info on cell service, and it sounds like coverage is pretty spotty throughout the park, but AT&T and Verizon are the best bets. https://www.nps.gov/yose/planyourvisit/internet.htm
LikeLiked by 1 person
great writeup thanks. how deep is the water? hope it is only a few inches and very deep.
LikeLike
Which specific body of water are you asking about?
LikeLike
Ok, got it. I have seen two reports this week that say the water is ankle deep. And, there was a report on 7/16/2017 that said the creek crossing was knee deep, but easy to cross (not swift moving). So, the creek seems to be getting lower by the week at this point. I imagine by next week you may still have to take your shoes off and walk through ankle deep water, but you may get lucky and be able to rock hop with your shoes on. Good luck.
LikeLike
*not very deep
LikeLike